As kayakers, or
anyone for that matter, one thing we can do to minimize
our indirect impacts is to squeeze the most mileage
from our gear and everyday belongings as possible. We
can do this by performing routine maintenance, then
repairing when necessary. Not only is this mileage squeezing
ecologically sensible, it's
money in your pocket!
General
gear maintenance and care
Other than a few
tricks of the trade, here are some tips we could all
be reminded of on occasion.
- Make a conscious
effort to keep your gear out of the sun as much as
possible. UV rays fade and weaken all fabrics, plastics
and composites.
- When your
kayak is on top of a car, park in the shade if
you can. Carry your paddle inside too and if that
isn't possible, make yourself a paddle bag.
- Hanging gear
in the sun is a sure-fire of getting it to dry
faster. It is also a sure-fire way of shortening
its lifespan. Hang it in the shade instead!
- If shade
is available on your lunch breaks, take advantage
of it then too. Every little bit adds up.
- Never pack your
gear away until it is completely dry. The damage this
causes is not immediate but can considerably shorten
its life. Hang loosely so air can flow in and around
for quick and even drying.
- Once home, thoroughly
rinse all your gear with fresh water from a hose (get
double use out of this water by rinsing over plants).
This removes silt and sand from the material which
can grind away at the fabric like a slow sander. It
also removes body oils and salts from your apparel
which can eat away at the fabric and cause the stinky
funk.
- Periodically rinse the inside
of your kayak making sure to remove all sand and gravel.
This stuff gets trapped under the seat and pillars
and acts like course grit sandpaper on the inside
of your hull. It's getting plenty of wear on the outside.
No sense in adding to it from the inside too!
- keep all balms,
lotions, sunscreen, etc away from the latex gaskets
on your drytop and/or drysuit.
- keeping your
latex gaskets lubricated (every couple
uses)
allows them to slide more easily over your body parts
taking a great deal of stress off them. It is also
believed that some products will keep the latex supple
and minimize the chance of it cracking. 303 Protectant
has been the preferred lubrication/treatment.
As nutty as it may sound, I used "extra virgin
organic olive oil" for nearly 8 years. Seemed
to work great but it may have shortened the lifespan
of my gaskets....but I can not say with certainty.
- clean your drysuit zippers every
2-3 uses with a toothbrush or similar then lubricate
with a light coating of wax. Also, make sure nothing
gets piled on your suit either during transport or
at camp. Kink that zipper and it won't be dry anymore
or, may not even zip!
- to get the stinky
funk out of synthetic wicking layers and neoprene,
add 1.5 - 1.75 cups (small to medium
loads) baking soda to the wash and agitate
for a few minutes before turning it off and letting
sit overnight or 24 hours. After this soaking, add
normal amount of mild detergent then finish the wash
cycle. No need for the pricey and specialized odor
removers and shampoos/washes.
- many care tips
can be found on the McNett
site. Look under both "Outdoor Gear" and
"Dive Gear".
General
gear repair tips
 |
Latex
bootie hole & rip repair. Small punctures
(A) can easily be repaired with a dab of Aquaseal.
To repair rips (B, slightly larger than a quater
$.25 in this case), cut a patch 10-20% larger than
the tear from an old saved gasket or innertube;
rough-up patch & latex being repaired w/ sandpaper;
clean both w/ rubbing alcohol; smear a thin layer
of Aquaseal on latex being repaired; place
on a level surface; put patch on; hold in place
w/ a book; let cure overnight. |
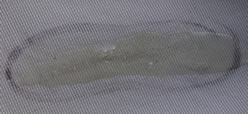 |
Finding &
repairing leaks in Gore-Tex & similar materials.
Turn garment inside out; lightly rub a
cloth soaked with rubbing alcohol on suspected leak
area (actual point of leak will turn contrasting
color); mark leak w/ marker; let dry; and dab a
thin layer of Aquaseal over leak. In the
left pic, a 1" long abrasion caused leak was
repaired in the same way. |
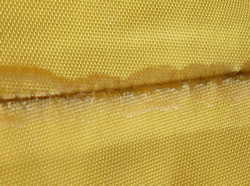 |
Drybag seam
repair. When seam tape peels off, just
seal the outside seam in that area w/ Aquaseal.
Prior to this type of repair, warm the Aquaseal
by placing tube in hot water for a few minutes.
This will allow the Aquaseal to flow more
freely and penetrate the thread & thread holes
more effectively. |
 |
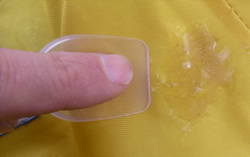
Drybag
hole repair. Even fairly good sized holes
can be solidly repaired with nothing but Aquaseal.
Place packing tape on the backside for temporary
reinforcement; apply a thin layer of warm Aquaseal
to outside and spread with plastic spoon; let cure
overnight; turn bag inside out; remove tape and
apply a thin layer of Aquaseal on the inside. |
 |
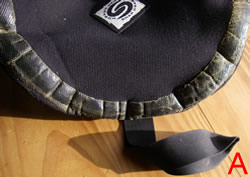 |
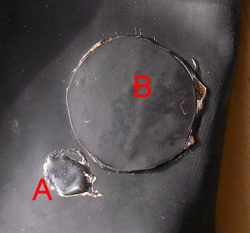
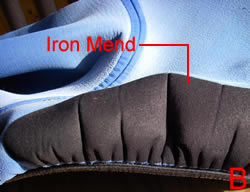
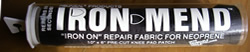
Reinforcing
skirts. High wear areas on unreinforced
skirts can be retrofitted in two ways: Aquaseal
(or similar material) as shown in pic "A"
or w/ Iron Mend as shown in pic "B".
Either way, you want to place the skirt on the
boat. Then, if using Aquaseal, apply
duct tape on the inner edge to create a nice finished
looking edge; smear the Aquaseal (or
similar material) w/ a popsicle stick or old butter
knife; let dry overnight; and peel of tape using
a razor to separate if needed.
For an Iron
Mend reinforcement, cut the Iron Mend
to desired size and simply iron on per its instructions.
|
 |
 |
 |
While 'Aquaseal
Urethane Repair Adhesive
& Sealant' is great for patching and sealing
small holes in neoprene, a 'neoprene cement' is
your ticket for adhering neoprene to neoprene. Most
dive shops carry it. |
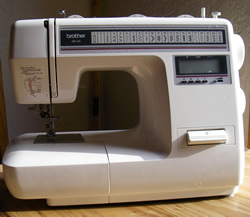 |
A
sewing machine comes in handy & is a great all
around investment. Not only can you repair
your gear & everyday clothes, you can make your
own things too. And contrary to popular belief,
you don't need an expensive heavy duty machine to
do this, unless you plan to do it professionally.
The pictured machine cost less than $150 yet has
made countless repairs to everyday clothes and made
numerous pieces of outdoor gear involving two or
more pieces of webbing. It just requires a small
amount of practice & the correct needle for
the job. Fun, liberating & money saving. |
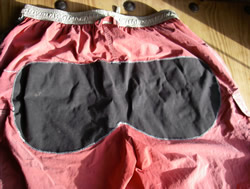 |
Wear the
keister out of your shorts? Sew on a patch
rather than letting the garbage man take them. It
can be done for pennies and takes no longer than
watching a Simpsons episode. |
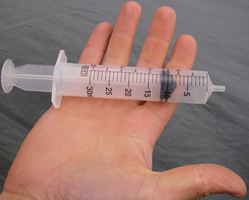 |
Seam
sealing sil-nylon tents and drybags. The
first step is to get yourself a large syringe
from a farm supply store. This will be your mini
caulking gun. Next, set your tent up taught (or
in a drybags case, fill it with something) then
mix two parts 100% silicone sealant/caulking (available
at any hardware store) with four parts low-odor
mineral spirits or Coleman fuel. An old cup or
tuna can works well for the mixing container.
Now, suck this concoction up into your syringe;
place it on the outside of the fabric at about
45°; and apply, slowly and evenly.
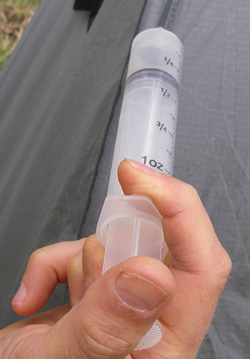
There are several
reasons for this method as opposed to applying
silicone right out of the tube. This less viscous
sealant flows down in to the thread holes for
more effective sealing; soaks in to the thread
as opposed to just covering it; and keeps things
streamlined and light. Don't forget to use gloves
when doing this. A respirator isn't a bad idea
either. |
 |
- neoprene repair
(holes & tears in skirts, wetsuits,
etc)
- repairing sil-nylon
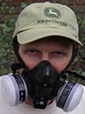
The
adhesives and sealants you'll need to make repairs with
are nothing but chemical cocktails. As such, I do all
my repairs outside... preferably with a breeze to my
back. If you need to do the repairs inside, consider
using a respirator, if you have one. Some latex gloves
are always a good idea too.
Yes,
you are more likely to get struck by lightening than
experience acute sickness or death from chemical poisoning
on such small projects. However, I work on the premise
of having no reason not to take the little bit of extra
time to protect myself from unnecessary inhalation or
dermal exposure, adding to my chemical body burden.
Whether you are
a sewing newbie or ready to tackle the repair or making
of your own gear, the below links are choke full of
good tips and general information.
|
