| Carefully planned meals are a crucial
piece to the self-support comfort puzzle and hide many
often overlooked dividends. When you have a light and
compact food load that still meets your physiological
and psychological needs, you will get far more out of
your trip not only in the sense of physical ease, comfort
and morale, but in your sense of awareness as well. Any
time your awareness is heightened, you minimize the chance
of a mishap and if something does go awry, your ability
to effectively react will be far better. Being more connected
with your surroundings also gives you the added benefit
of seeing many of nature’s nuances that might otherwise
be missed. This will greatly enrich your experience in
its entirety. As Pliny the
Elder said, "to be fully alive is to be fully
awake". Fuel your body and mind with good food.
While having light yet tasty, nourishing
and filling food may seem like an insurmountable task,
it is very doable with extra attention in the planning
stages. Basically speaking, there are three ways of
going about this: Freeze-dried backpacking type foods;
food you prepare yourself from foodstuffs purchased
at the super market; or, a combination of the two. For
the pure enjoyment of it, I prefer to concoct all my
own food from scratch with super market foodstuffs.
When pushed for time, I'll purchase freeze dried or
deydrated "backpacking" dinners and assemble
the rest (click on "recipes" below for a sampling
of various meals). Regardless of method, below are tips
to help you get the most from your self-support food.
°
recipes
|
While
my motivations for choosing organic are numerous,
the most fundamental reason is personal
health. There are innumerable concerns
with ingesting chemical residues found on conventionally
grown food long term, and studies
suggest organically grown food is more nutritious
(more here).
On another level, organic farming does not pollute
the air and water with chemicals. There are also
numerous ecological concerns with conventional
farming as well as the loss of critical topsoil.
Did
you know that agricultural chemicals are the greatest
source of water contamination in the U.S. and
pollute up to 97% of streams and 60% of wells?
Read more here.
What
about the price$? Organically grown food
is more wide spread than ever. As a result, the
price gap has shrunk between it and conventionally
grown food. At times, organic is even equal in
price or less. Still, as a rule,
organic is more expensive. To squeeze the most
from your dollar, shop around for sales and the
best deals. Specialty shops are typically the
most expensive while outlet stores the least.
Food co-ops and/or farmers markets are usually
the most consistent and logical sources.
Be
leery of labeling & the unscrupulous seller.
As
unfortunate as it is, just because something is
labeled "organic" at a farmers market
doesn't mean that it is organic. Your best bet
is always to grow your own. The next best option
is to purchase from trusted sources. When that
isn't possible, purchase items that have been
"certified" to be organic. Even though
the current certifications have loopholes, tests
have shown "certified" products to be
consistently lower in chemical residue than conventionally
grown foods (see below). The farming practices
are usually more ecologically sound with the "certified"
organic products as well. Remember. Our long term
health is dependent on a healthy environment.
Some
believe the term "organic" is nothing
more than a sales gimmick. Test data from the
following three U.S. sources have shown organically
grown food to be lower in chemical residue than
conventionally grown food:
- The
Pesticide Data Program of the U.S. Department
of Agriculture
- Marketplace
Surveillance Program of the California Department
of Pesticide Regulation
- private
tests conducted by Consumers Union.
For
more info, click here.
If
you grow a lawn, consider converting part of it
in to a garden. It's fun; you get to have total
control; it saves money; and gives a sense of
independence and health. There may also soon come
a day when growing your own will again become
more of a necessity rather than an option. |
Freeze dried foods
The advantages to these foods is
that they are so simple and convenient. Depending on
the type of food, you either eat as is or just boil
water, pour it in the pouch*,
stir, let sit and eat. Other than washing your spoon,
there are no dishes to do. You can buy single foods
such as corn, peas, peaches, etc., or whole entrees
such as pasta primavera and turkey tetrazzini. There
is even freeze dried ice cream for dessert. Yes, ice
cream! That aside, and some may even like it, many of
these foods taste surprisingly good too. The
downside of
this food is
the cost, especially considering the scant serving sizes.
A similar
option would be the instant "certified organic"
foods by Mary
Janes Farm based out of Moscow, Idaho. Most
of her ingredients are dehydrated as opposed to freeze
dried but, they are just as light, and like their counterparts,
these foods can be prepared and eaten straight from
the package. In some instances, Mary Janes' portions
may be slightly larger than some of the others. The
ingredients are simple, natural, and few but the combination
used creates flavors that have definately
been a hit around our campfires. The most unique
thing about this company is that they offer these foods
in bulk. This is nice as it allows one to package for
themselves any portion they wish. All one needs is some
zip-lock bags. Buying in bulk also saves one a substantial
amount of money. Coming
in 3 pound zip-lock packages, these bulk meals can cost
as little as $2.00/serving. Compared
to the typical $5.00 - 8.00/serving backpacking meals
containing food that was grown with chemical fertilizers
and sprayed with toxic insecticides, these Mary Jane
bulk meals are the clear winners! For these
reasons and Mary Janes other environmental efforts,
this food is my top choice for lightweight travel when
I don't have time for homemade.
*Due
to all the uncertainties with chemicals used in packaging,
I have stopped preparing my freeze dried meals in their
pouches because of leaching concerns. Instead, I pour
the contents in to the pan of boiling water, cover and
let sit. Same concept and results as preparing in the
pouch. While not as as convenient (pan needs to be washed),
convenience in the contemporary sense is rarely conducive
to well being in the long run. Click here
for additional info on chemical leaching.
Super market foods
You'd be amazed at all the different foodstuffs you
can find by cruising the aisles of your local super
market. If you can think of it, you’ll probably
be able to find it, and if you don’t see it in
one store, chances are, it'll be in another. Some of
these foods can be cooked as is. Or, you can purchase
individual ingredients and make your own from scratch.
A health foods store will also have some interesting
items.
The key things to look for are dry,
light and if it needs cooking, short cooking times.
Cooking requires fuel and fuel equals weight. I avoid
foods that require much more than three-four minutes
solid boil time.
Below is a small list of foods to
look for. Most of these items can be bought from bulk
which eliminates wasteful packaging and is usually a
fair bit cheaper.
Breakfast
instant hot cereals, cold cereals, breakfast bars,
instant oatmeal, instant breakfast drinks, instant
spiced cider, instant cocoa, instant coffee, instant
tea or tea bags, instant milk powder, instant potatoes,
instant pudding, minute rice, nuts, seeds, dried fruit,
fruit wraps, jerky, salami, pepperoni, string cheese,
powdered drink mixes, powdered shakes, pilot bread,
condensed bread, bread sticks and wheat crackers.
Lunch
the various different energy and protein bars, granola
bars, dried fruit, fruit wraps, nuts, seeds, jerky,
salami, pepperoni, string cheese, packaged tuna &
salmon, wheat crackers, pilot bread, condensed bread,
bread sticks, large pretzels, condensed mincemeat
and nut butters (peanut, almond, etc).
Dinner
jerky, salami, pepperoni, packaged tuna & salmon,
string cheese, minute rice, rice mixes, dehydrated
refried beans, instant potatoes, ramen noodles, noodle
dinners, angel hair spaghetti, soup packages, soup
mixes, dried vegetables, dried fruit, fruit wraps,
wheat crackers, pilot bread, condensed bread, bread
sticks, large pretzels, powdered drink mixes, instant
pudding, instant cocoa, instant spiced cider and tapioca.
Another option, mentioned previously,
are the instant organic foods by Mary
Janes Farm. They offer many bulk food choices for
the do-it-yourselfer at a fraction of the cost of traditional
"backpacking" food.
Meal planning
First, you’ll want to figure how many breakfasts,
lunches and dinners are needed. You can usually leave
out the dinner on the last day and even the lunch if
you think you’ll make it to the take-out by lunchtime.
So, a three day trip with an AM start and early PM finish
would include: 3 lunches, 2 breakfasts and 2 dinners.
For examples of complete meals, see "sample
meals" at the bottom of this page.
When preparing your own at home:
- Make easy to prepare meals
that require little cooking time. This way you can
spend more time doing other things and you won’t
have to carry as much fuel.
- Pre-measure everything so there
is less preparation time at camp.
- Put each different part of
each meal into its own ziplock and label the contents
and instructions with a permanent marker. Then put
each of these into one big bag. Can't tell breakfast
from dinner? Grab that permanent marker again.
- Though not necessary, if you
own or have access to a vacuum food sealer, use
it. Not only does it take some of the bulk out,
compared to using ziplocks, your food is less likely
to get pulverized when packing/unpacking.
General tips:
- To keep your palate and nutritional
needs happy, plan for a variety of food and try
to eat similarly to how you do at home. Not surprising
your body with a strange diet will help keep any
sudden and unexpected bowel movements at bay and
your drysuit clean.
- For variety, add small portions
of several types of foods instead of one big helping
of just two types of food. For each meal, I like
to take a snack size zip lock bag full of dried
fruit labeled with the quantity.
How much to take
There are a lot of variables to take into account when
figuring out how much food to take. Some backpackers
go by the rule of two pounds per day per person, while
others argue that’s too little or too much. Since
everyone’s appetites and requirements differ and
there are no standards of how food must be prepared,
this is a futile argument. Plus, one persons heavily
calculated one pound of dehydrated food might produce
more bulk (once reconstituted)
and nutrition than two pounds of some one else’s.
It’s all in the planning stages.
As a rough idea, with a fair bit
of pre-tip prep time, I can get by quite comfortably
on a total of 15-16 ounces per day on the average
decent-weather 4 day trip. If it’s cold and/or
lots of hiking is required/desired, I’ll add
an ounce or two to that. For reference, I'm a medium/heavy
eater and 5'-11" and 150 lbs. The following is
what’s involved:
- no canned goods
- no fresh produce
- no Army MRE's
- no containerized beverages
- combination of home brewn concoctions
and freeze dried backpacking meals
- Lots of home dehydrating. By
dehydrating your own fruits, you can lower the moisture
content enough to cut the weight 7-8 times that
of commercially dehydrated. This has little to no
affect on the flavor.
- For bread, I use condensed
bread, pilot bread, large pretzels or bread sticks
instead of bagels. High nutrient whole-wheat crackers
are good substitutes too.
Dehydrating food
Besides the weight saving benefits, dehydrating your
own gives you full control of your food, and can give
a real feeling of accomplishment. A dehydrator can be
purchased for as little as $50 (see pics below). Depending
how much they are used, these can last from 1-10 years.
To take advantage of fruit found on sale, as well as
my own harvest at home, I gave up on these smaller and
less expensive models (I went through 3) and purchased
a larger Excalibur
unit with temp control and timer. I also opted for stainless
steel trays due to the unknowns with plastics. At $500,
it was not cheap. My cupboards are always stocked with
healthy and inexpensive snacks though...and when something
does wear out on it, the replacement parts are readily
available, inexpensive, and easy to replace. If you're
ok with BPA free plastic trays, a $100 bill can be saved
by going that route. If you think you'll only use a
dehydrator for preparing the occasional self-support
snack or meal, and are ok with plastic trays, there
is nothing wrong with a $50 unit like the one in the
pic below. Just make sure it has a fan. Drying on a
dehydrator without may take longer than the trip it
self.
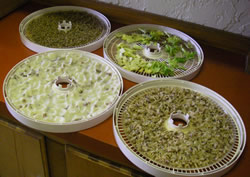 |
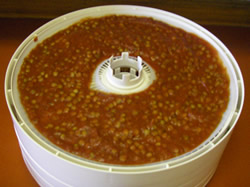
| Fruit leather
trays in action: lentils top left; mashed potatoes
bottom left; brown rice bottom right; celery upper
right; and pasta sauce with lentils below. |
 |
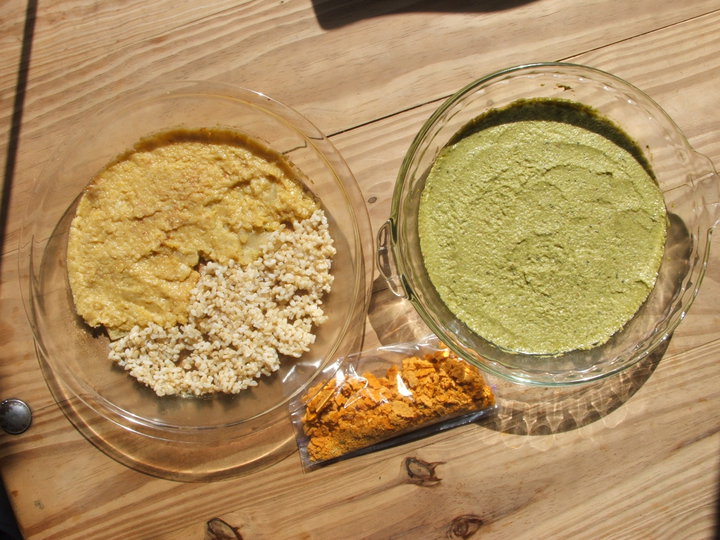 |
| Using
pie plates for dehydrating. Ready for the dehydrator:
red lentil dahl w/ brown rice on left, (finished
garbonzo bean soup in center zip-loc), and asparagus
pesto on right. |
It’s also a good idea to purchase a dehydrator
with fruit leather trays. Not only can you make fruit
leather, you can dehydrate sauce,
pesto, salsa, and small
things like corn and peas without them falling through
the trays. Again, due to the unknowns with plastics,
I now use glass pie plates in mine (see bottom right
pic). To prevent fruit from sticking, I spread a light
layer of coconut oil on the plates. I use olive oil
otherwise.
Additionally:
- When preparing, slice all
your fruit and veggies into slices less than 1/4”
thick. This will speed up the drying process considerably.
- To minimize strawberries from
sticking to the trays, cut into quarters (or
sixes if big), and place skin side down.
- To speed up cooking time at
camp, partially cook the sliced veggies at home
prior to dehydrating.
- Note
how many slices are in the average apple, banana,
carrot and so forth. This way you’ll have
a better gauge of how much to take and be able to
better mimic your normal eating habits.
Emergency food pack
Each person should carry one additional non-cook food
pack in case of an emergency. If there is no crisis,
it’ll come in handy if you have to wait for your
shuttle driver or will hold you over until you get to
the nearest restaurant. Ideally this should be a highly
concentrated, light and high calorie food such as meal
or energy bars. Bring enough for at least one full meal.
Foraging
Foraging is a great way of snacking, rounding out a
meal, culturing the palate and breaking up the monotony
of dried food. Salad greens, herbs, fruits, shoots,
roots, flowers, seeds and nuts… perfectly good
and often times quite palatable edibles abound once
you learn to identify them. There are nearly always
at least a couple decent varieties that can be harvested
right in camp with minimal effort. And many do not require
cooking. I have picked and eaten greens while setting
up my shelter and, at every opportunity, eat those,
berries and flowers on the go while scouting, portaging
and hiking.
| Not
only is learning to identify edible plants fun,
it is an ancient skill you can carry for life and
a superb way to build a closer understanding and
relationship with your surroundings. |
Grown on natures terms without chemicals,
the quality of this food can not be beaten. Free in
cost, fun, different flavors, no carried weight and
as fresh as it gets. What more could you want?
There are
many guide books on the subject. A fairly recent and
good one...at least for the west, is Edible
& Medicinal Plants of the Rockies
by Linda Kershaw. For general plant identification in
the Rockies, take a look at Plants of the
Rocky Mountains by Kershaw, MacKinnon
and Pojar. Excellent book!
General food tips
- Pack your food in a variety of
bags so they can be reused at camp or on the water.
Click here for an
example.
- Pack your lunch in a separate
and accessible drybag so when lunch time comes, you
don't have to unpack the main bags. I only cook at
breakfast and dinner...when every thing is unpacked.
- Lipton cup-o-soups and similar
packets amount to very little by themselves, but make
a great base for home made soups (see
my Chicken and Veggie Soup
recipe).
- Spruce up crackers and bread
by putting a spread on such as peanut butter, almond
butter, etc. Do the same with dried fruit. It's a
tad heavy but makes a nutritious and tasty lunch snack.
These spreads can be carried in a reused 7 ounce container
that cream cheeses, pestos, etc come in. Alternatively,
if the spread is not too thick, one could use the
bottom filling squeeze tubes that are available at
most outdoor stores.
- For a non-cook desert, or whenever
you have a sweet tooth, try dried pineapple, cherries,
apricots or plums. These are mouth-watering and healthy
substitutes for candy and other products containing
refined sugar.
- Also, repackage any supermarket
food that has excessive packaging. This eliminates
bulk and saves a bit of weight.
- Most super market soups (2
¼ ounce Nile Spice, Nissin and Maruchan)
need to be doubled or tripled to make one main course
for one person. As a booster to these, you can add
dehydrated vegetables, freeze-dried meat or minute
rice. If taking freeze-dried meals, take the same
thing into account.
- To protect your food from rodents,
insert it in one of your stuff sacks or dry bags and
hang from a tree before bed time. Under the cover
of darkness, these bucktoothed thieves will not hesitate
to chew their way through any thing they can reach
with food in it...including your shelter. I had one
chew through my bivy in three seconds flat to reach
a rice cake near my ear.
Sample
meals
Below are samples of my typical meals
to give you a starting point. Most of this is home concocted.
The recipes can be found here.
If not inclined to make your own, just use backpacking
entrées for the main dinner course. Breakfasts
can be handled the same way. Desserts can be as simple
as dried fruit. Don't like tea? There's plethora of
other instant or easy to prepare drinks including spiced
cider, cocoa, coffee and milk, etc.
Sample
1
Breakfast:
rice pudding & tea. Lunch: bar,
roasted pumpkin seeds, dehydrated hummus, crackers
& dried fruit. Dinner: pasta,
bread sticks, tea & peachy apple crunch.
Sample
2
Breakfast:
oatmeal & tea. Lunch: jerky or
tuna packet, crackers, roasted nuts & dried fruit.
Dinner: aspargus pesto, bread sticks,
tea & cherry applesauce.
Sample
3
Breakfast:
Idaho Spuds & tea. Lunch: string
cheese, crackers, dehydrated edamame dip, roasted
pumpkin seeds & dried fruit. Dinner:
Indian Dahl with rice, camp picked greens, granola
with strawberry rhubarb sauce & tea
.
|