|
There's something about heating with a wood
fire. The heat is penetrative, and soothing to body and mind. Watching
the flames directly is mesmerizing. Watching their shadows dance
against the dark is magical. It's alive. There's something else
about fire though. Something primal. Something far more abstruse.
These lures have popularized fires for the wealthy,
not so much as an instrument of heat but rather as a luxury used
on special occasions for its ambiance. At the same time, there is
a notion that the use of fire for heating purposes is a means utilized
by those on the lower end of the socioeconomic scale. The practice
conjures up images of watery eyes, fits of coughing, and plumes
of smoke going into the atmosphere. Environmentally irresponsible
and socially unacceptable in the eyes of many. Sadly, in many cases,
there is truth to these perceptions. The reality can be far different
though.
Poor burning practices, old technology, and careless harvesting
has given wood heating an undeserved reputation. This is unfortunate,
as contrary to popular belief, when everything is accounted for,
wood combustion has the potential to be the most environmentally
friendly heating source available. This, of course, is not considering
simple passive solar heating (heating with the sun) which outshines
every other option, in every way. Outside of passive solar though,
heating with wood, if done properly, is the cleanest over all option.
"When the contributions
of all the components of energy production for residential space
heating and the atmospheric fate of pollutants are taken into
consideration, wood combustion has the lowest greenhouse gas and
acid precipitation impacts per unit of heat delivered among the
energy options". From the proceedings of
the U.S. EPA and Air Waste Management Association Conference,
1998. http://www.omni-test.com/publications/neworlpap1.htm
However, realizing this potential requires diligence
and a fundamental understanding of physics. Below are some things
learned after a lifetime of observation... using stoves old and
new, in sheep camps, sheep sheds, wall tents, homes, shops, yurts,
hot tubs, and a sauna and water heater. The first thing that should
be considered is the fine particulate emissions. To a large degree,
this can be managed through proper burning practices and new technology.
Below are a few not so obvious but critical tips:
NEVER BURN:
- green wood
- wet wood
- salted driftwood
- plastics
- any kind of paper including magazines
- cardboard
- treated wood
- railroad ties
- painted, stained, & varnished wood
- plywood, particle board, OSB or any other
pressed &/or laminated wood
Why? Green and wet
wood both create excess smoke (pollution)
and a build-up of creosote which can lead to chimney fires.
Salted driftwood, plastics, papers, cardboard, ties, plywoods
and painted and treated woods create dangerous
poisons.
Additionally:
| Need
to sweep or vacuum around your wood stove? Wait until
you have a fast hot fire & crack the door open. The resulting
draft will pull much of the dust in to the stove. Your lungs
will thank you & your house will stay cleaner. |
- Use a modern and certified wood stove with
a glass door for easy fire monitoring.
Remember: more flames = more heat, less smoke
and less pollution. Vigilantly watch the fire. A glass door
makes this considerably easier. The flames also create an unmatched
ambiance, particularly at night when their reflections bounce
off the walls.
- Limit the time the damper is closed or
better yet, leave it wide open all the time. Closing
it starves the fire of oxygen causing the wood to smolder and
smoke (see below right photo). You'll
have to feed it more often with the damper open but you'll be
producing more heat and polluting less.
- If natural tinder isn’t available,
start fire with as little
Control
the heat with the size & positioning of wood.
If you want lots of heat in a hurry, once you have a
fire established, stack on several or more pieces of
wood in a random crisscross manner. This allows airflow
under & around the wood. To intensify this, use
smaller & more pieces. For the hottest fires, do
that while using less dense hardwoods such as those
from the genus Populus species, or a conifer such as
pine... all in the range of 2”-4” in cross
section. BE CAREFUL though! Doing this over a thick
bed of red-hot coals can have synergizing effects causing
fires to get intensely hot very quickly. Regardless,
mix & match with different sizes, shapes & wood
species for desired effect. Just start out small &
treat your inner most pyromaniacal tendencies to lots
of observation. |
newspaper as possible. Shiny slick paper
works poorly.
- 3-4 smaller pieces of wood make for a hotter
fire with less smoke than 1-2 large pieces. Remember
also that the denser (heavier) the wood, the smaller the pieces
need to be to get the fire burning strong and hot.
- When putting
larger wood in the stove, try to get it elevated to promote
airflow. This will insure full ignition, maximum heat, and the
least smoke. If the coals aren't situated naturally to allow
air circulation, place a shorter piece of wood under and perpendicular
to the larger piece on one or both ends.
- For optimal burning
with the least pollution and most heat, the wood needs to be
thoroughly dried/cured and split smaller than most think. When
using a stove sized for ~1000-1800 square feet, the bulk of
the wood in the wood pile should be between the size of a forearm
and calf on the average person. Pine and similarly resinous
woods can be slightly bigger since it ignites and burns easier.
Larger stoves heating more square footage can also accomodate
bigger pieces of wood. As a guideline for a large stove, consider
wood ~6” in cross section the maximum size for hardwoods
and roughly 8" for pine and similar woods. Most stoves
will create more smoke than heat with wood larger than this.
Also, aways insert the largest pieces on a big bed of established
red-hot coals only. Otherwise, the fire will not take a deep
hold on the wood and will simply smolder (if it doesn't burn
out entirely), producing little heat and lots of smoke in the
process. If you are going to dampen the intake, make sure the
burn on the newly inserted wood gets established.
- If split to these recommended small sizes,
some woods can be ready to burn in as little as 6 months...assuming
a warmer and drier locale. However, optimally, most woods should
be cured for 12 months and some, such
as Chinese Elm, should not be burned for 2 years. It
can not be stressed enough how important it is that the wood
be thoroughly dry. Properly cured wood, that is not wet from
rain or snow, makes all the difference in both heat output and
how clean it burns.
- How to tell if your wood is dry? Place
your lips on a piece that's split. Wood with excess moisture
will feel moist and cool to your lips. With experience, you'll
be able to tell if wood is dry enough by simply picking it up.
Wood with too much moisture to burn optimally will not only
feel heavier, any blows to or with it will be dull feeling and
sounding. Until you gain the expereince to discern this yourself,
rely on the lip test. Also, with nearly all woods found in the
western US, if the bark is still on and doesn't readily fall
or peel off, you can pretty much be assured the wood is not
dry enough to burn its best.
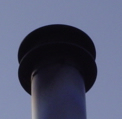
- Use your chimney for diagnostics. Though
it is
 |
 |
| Nice fire
inside & no detectable smoke outside = heat w/ minimal
pollution. This is optimum & not difficult with some
mindfullness. |
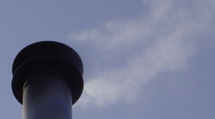
Though some
burners would not consider this a lot of smoke, it is
still unnecessary pollution. Smoke can
be caused from a number of things (see list to left).
In this instance, it was from closing the stoves damper.
|
normal for smoke to exit your chimney upon
starting a fire, once a good fire is established, there should
be little to no smoke (see photo at right),
depending on the wood used. If there is excessive smoke (see
far right photo), it indicates incomplete combustion
(fire not hot enough) and means one of
the following:
- wood is wet from rain, snow, etc
- wood is too green/not fully cured
- wood is too big
- damper not open
- Each stove and chimney set-up will have
its own personality. Some burn slow. Some burn fast. Some will
burn very fast! Some are more difficult than others to get a
fire started in. Generally speaking though, the taller the chimney,
the better the stove will draft which, will give you the ability
to easily build a lively and hot fire on demand.
How to
Start a Fire
Many people try to start a
fire with kindling that is far too big. Below are seven easy
steps.
- Make sure the stove
damper is wide open.
- Tightly wad up 4-6 pages of news paper
and place together in the stove.
- On top of the paper wads, place several
finger sized pieces of softer wood such as pine, cedar, redwood,
etc...then, on top of that, several pieces that are roughly
the size of two fingers followed by several pieces the size
of three fingers. A less dense hardwood will work too such as
poplar, aspen, cottonwood, etc. The more dense the wood, the
smaller it needs to be. These finger sized pieces of kindling
should be some where between 6" and 18" long. Keep
all the pieces of kindling apart so air and flames can go between.
Place in a criss cross pattern as much as you can.
- Light the news paper in several places
along the bottom.
- Close the door but DO NOT latch it...yet.
- Watch carefully and wait until the kindling
is obviously on fire, then begin placing incrementally larger
pieces of wood on. Do not get carried away and place more than
2-4 pieces on at a time, or pieces too large. Otherwise, you
risk smothering the fire and you'll have to start over. The
idea is to "build" the fire.
- Once you have the fire established, and
several forearm-sized pieces of firewood are burning well, you
can latch the door. NEVER walk away from a
fire with the stove door unlatched. Embers can pop out without
you knowing and catch something outside the stove on fire.
Be patient! Although it's easy to "start"
a fire, it takes patience to build it in to something you can
place an actual piece of firewood on. It takes some practice
to get proficient at this. Once you get the hang of things though,
you should be able to get a good fire established within 3-5
minutes.
New technology and good burning practices are
a great start to healthy wood burning but only 2/3’s of the
picture. The remaining factor is practical harvesting. To learn
more about this and how to obtain free firewood while helping the
environment at the same time, click here.
Additional woodstove burning information can
be found at the following sites:
http://www.epa.gov/burnwise/bestburn.html
http://www.deq.idaho.gov/air-quality/burning/wood-stoves/burn-better.aspx
WARNING:
Don't start any fire until you know your chimney is free of creosote
and the stove and pipe installation are to all applicable codes!
|
